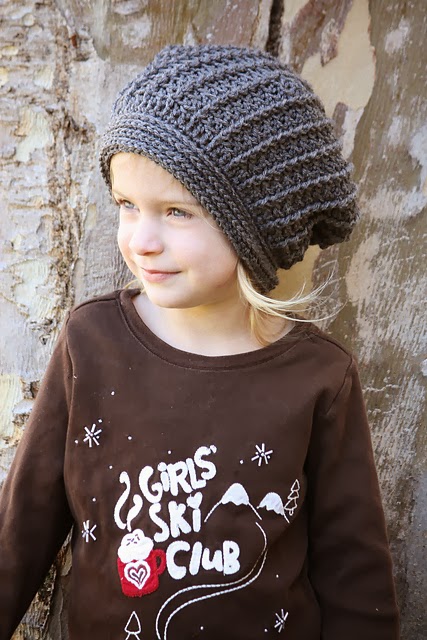
Well I seem to just kind of pop in randomly after long breaks :)
I recently had someone ask me to make a grey slouchy hat for her son. After searching around for a slouchy hat (which I hadn't ever made), I wound up creating one that was motivated by elements from several I saw. The ribbed look and increases were inspired from Jen2291's
"Basic Guy Hat" and the switching of hook sizes idea was from the
Super Slouch Hat . It makes a beautiful drape that I wasn't quite getting from using just one hook size.
So here is what I cobbled together. I've made this twice, but haven't had it tested. So if you find problems please let me know :)
ETA: Thank you Jen for helping find the error with the child size!
Errata: The child size should start with 10 hdc in the magic ring, and the adult size starts with 12. This allows both hats to have the same increases and the right spacing of post stitches for the main body of the hat. Sorry for any confusion this may have caused!
Supplies:
M hook
K hook
H or I hook. I made the hat with an H hook and it fit a 19.5-21" head with room to stretch more. But, two others have said the H hook made the hat come out a bit small. So an I hook may work better.
Worsted weight yarn. A yarn like Vanna’s Choice or KnitPicks Brava provides a nice drape
Gauge:
4" = 15 sts (5 fpdc and 10 hdc) x 10 rows
Abbreviations:
FPDC: front post double crochet
HDC: half double crochet
BLO: back loop only
FLO: front loop only
Sts: stitches
Sl st: slip stitch
Note: For each “join” - use a slip stitch to join to the first stitch of the round.
Note: For the first stitch of the round, work into the same stitch that you chained out of. Initial chain of each round does not count as a stitch.
Child (adult is in R1 parentheses and the second stitch count at the end)
Using an M hook:
R1. 10 (12 hdc if making adult size) hdc in magic ring and pull close. Join. (10, 12)
R2. Ch. 2, *fpdc, hdc in BLO of same stitch (so working behind the fpdc)* around. Join. (20, 24)
R3. Ch 2. *fpdc into fpdc below, hdc in BLO of next 2 sts* around. Join. (30, 36)
R4. Ch 2. *fpdc into fpdc below, hdc in BLO of next 3 sts* around. Join. (40, 48)
R5. Ch2. *fpdc into fpdc below, hdc in BLO of next 4 sts* around. Join. (50, 60).
R6. Ch2. *fpdc into fpdc below, hdc in BLO of next 5 sts* around. Join. (60, 72)
Switch to K hook
R7: Ch2. *fpdc into fpdc or stitch below, hdc in BLO of next 2st* around. Join. (60, 72)
R8-9. Ch2. *fpdc into fpdc below, hdc in BLO of next 2 st* around. Join (60, 72)
Switch to H or I hook
R10. Repeat R8 until hat measures 8” for Child hat or 9" for Adult hat.
Brim:
NOTE: The sl st rounds will “tighten up” the hat. If the hat is already the fit desired, then work the slip stitch arounds *loosely.* If you need the hat to tighten up a bit more, then work them normal.
R1: Sc in each st around. Join. (60, 72)
R2. Sl St in FLO of each st around. Join. (60, 72)
R3. Working in the unused back loops of R2: hdc in each st around. Join. (60, 72)
R4. Working in the loop in the *back* of the stitch (so pull the stitch forward and look behind it, there will be a loop that makes up the back of the hdc you'll be working into), hdc in each st. Join. (60, 72)
R5-6. Repeat round 4.
R7: Working in the loop in the *back* of the stitch, sl st in each st around. Join (60, 72)
Fasten off and weave in ends.